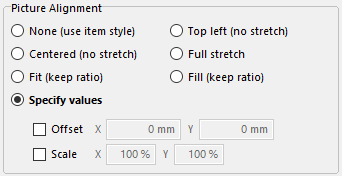
The PictureBox Alignment editor is used to specify the size and position of images inserted into a textbox as the result of the processing of a slogan, a macro, or a SARA.
•When using InDesign, as part of the image token conversion, the current box is emptied of its text and the requested image is imported placed into the box. As textboxes and pictureboxes are the same in InDesign, the end result is the same box, which means that all attributes (round edges, framing, ...) are maintained.
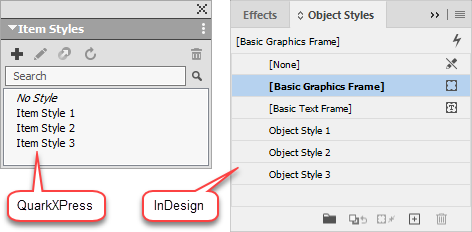
•When using QuarkXPress, as part of the image token conversion, a new picturebox is created corresponding in position, size and many respects to the initial textbox. But the recreated picturebox does not match all the aspects of the initial textbox. To ensure the best match between the initial textbox and the created picturebox, we recommend using item styles and the None (use item style) alignment option, as discussed below.
Some of these alignment settings are also used in the options of various image tokens, as well as in the picturebox options script line property editor.
These are the basic, parameter-less settings, corresponding to the images on the right.
➢This option requires QuarkXPress 2017-2026 or InDesign 2020-2026.
When using QuarkXPress, to be able to use the None alignment, your output file must have at least 2 item styles defined, and that the None alignment cannot be used on a textbox that uses the No Style object item style.
Center (no stretch)
The image's center is placed at the center of the picturebox. The image's size is not modified, neither to fill the box nor to fit into the box.
Top-Left (no stretch)
The image's top-left corner is placed at the top-left corner of the picturebox. The image's size is not modified.
Resizing Picture Alignment Options
These are options in which the picture is re-sized relative to the picturebox in which it is placed.
Naming conventions
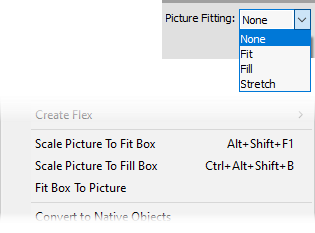
Fit (Scale to fit)
The image is either shrunk or enlarged proportionately until either the height or the width of the image fits into the picturebox, and the other side is smaller than the picturebox. The shrinking or enlargement is done keeping the original image's proportions, so most often the result will be an image that has one side smaller than the picturebox. The full image is visible with this option.
Fill (Scale to fill)
The image is either shrunk or enlarged proportionately until either the height or the width of the image fits into the picturebox, and the other side is smaller than the picturebox. The shrinking or enlargement is done keeping the original image's proportions, so most often the result will be an image that has one side smaller than the picturebox. With this option, the entire picturebox is filled, meaning that some parts of the image might be outside the picturebox's boundaries.
Full stretch
The image is either shrunk or enlarged, without regard to its initial length-width ratio, until both the height and the width of the image fit snugly into the picturebox. The shrinking or enlargement does not keep the original image's proportions, so the result will usually be a distorted image.
Specify Values
Using the Specify Values to specify the X/Y position offset and/or the X/Y scale change the image inserted in the PictureBox, when using QuarkXPress 2016-2026 or InDesign 2020-2026.
Advanced Picture Alignment Options

Transparent
Use the Transparent option to specify that the inserted picture should be transparent (for black & white and vector images), when using QuarkXPress 2015-2026. Note that, when using InDesign, transparency is automatically applied, if the chosen image supports it.
Using the Fit box to picture option to specify that the picturebox height or width should be reduced if it is taller or wider than the enclosed image as currently displayed. What is meant by "as currently displayed" is that the X/Y scale of the picture will not be changed by the use of the Fit box to picture option. This setting requires QuarkXPress 2016-2026 or InDesign 2020-2026.
PDF Box to Use
This option is used to specify the PDF box to use when importing a PDF file as image. This setting only applies to the use of PDF files as images, and it requires QuarkXPress 2016-2026 or InDesign 2020-2026.
Page Number
This option is used to specify which of the pages of a multipage PDF document to use when importing a PDF file as image. This setting only applies to the use of PDF files as images, and it requires QuarkXPress 2017-2026 or InDesign 2020-2026.
Topic 136800, last updated on 26-Oct-2023