QuarkXPress and InDesign handle the objects placed on master pages very differently:
In QuarkXPress, the objects on master pages can always be overridden and, most importantly, the overriding is managed by QuarkXPress object-by-object behind the scenes. This means that only the objects that have been modified (by token replacement or deletion, for example) are overridden, the remaining objects remaining as single instances on their master page.
Thus the different guidelines below.
QuarkXPress: use master pages only for margins
Having 2 levels of "masters" can only lead to user (and sometimes QuarkXPress) confusion.
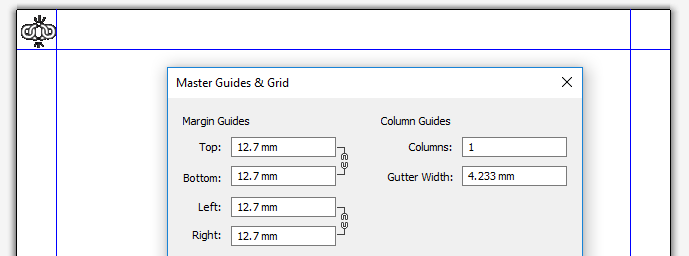
The only information that should be specified in your QuarkXPress GridTemplate's master pages are the page margins, as shown in the image on the right.
InDesign: use master pages for margins and all fixed elements

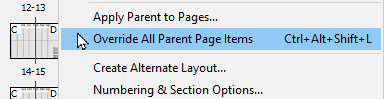
Note how the fixed elements of page 2 of the template have been moved to its master page B, with their Allow Parent Item Overrides setting turned off
Your InDesign GridTemplate's master pages should contain the page margins, as this is the only place where these can be set.
➢For any template of 2 or more pages, make sure to have at least one left-side and one right-side master page.
Additionally, if your generated diary contains over 200 pages, as well as many lines and images, then you should move all the fixed element of your template (lines, images, tables without tokens, textboxes without tokens, ...) to the master pages of your template, as shown on the right.
When selecting the objects to place on your master pages, remember the following:
•Do not include textboxes which contain tokens.
•Do not include objects that are part of a group that might be affected by a group delete token or command (from a macro or a sara).
•Do not include elements that are on layers that may be affected by a delete layer token or command (from a macro or a sara).
•Do not include textboxes which, though they do not contain tokens, might still be affected by Saras.
All the elements placed on your master pages should then have their Allow Parent Item Overrides setting turned off, as shown in the image on the right, to ensure that these fixed elements are not multiplied on each page that comes from that master page (this is particularly important for the main grid which can often number hundreds of pages).
Note that, if you move fixed items to the master pages of your templates, then you should use the disambiguate master pages generation option, which is turned on by default.
See also: differences between QuarkXPress and InDesign, master pages in QuarkXPress output files and master pages in InDesign output files.
Topic 174095, last updated on 21-Jun-2024